This session, we were mostly running down what we're going to be handing in for our Dynamics submission. Beforehand, we had a talk from animation graduate Millie Woodcock. She gave a talk about overworking ourselves, and how it's often glorified. A huge emphasis was placed on us managing our time correctly, and learning to take a break to do nothing!
"Doing nothing often leads to the very best something" ~ Winnie the Pooh
We work so we can live, not living so we can work. The biggest advice given was to take regular breaks from the computer / animation work! 5-10 minute intervals are healthy. Also, going outside is beneficial.
("The Closest Feeling to Death That Isn't Death - dir. Jaiden Dittfach)
After the brief talk of wellbeing, we moved onto our Dynamic Exercise Task! The breakdown of the animation is
Be 50-75 frames (around 3 seconds)
Can be either digital or hand-drawn
Only one shot, no cuts
Black and White
Simple
... and the animation should focus on one of these pairings
Weight and Effort
Speed and Acceleration
Squash and Stretch
Impact and Reaction
We're also recommended to use live action reference. It helps to understand movement and timing, in a more realistic way. Directors will often act out a scene to communicate what actions they want to the animators.
(Toy Story: Behind the Scenes - Pixar Animation Studios)
Animators will often use mirrors to convey facial expressions onto characters they're animating as well. Once we got the brief, we started storyboarding. After some ideas, I eventually settled on a final mini-plot. In it, we start with a stick man and a basketball hoop. The stickman looks up at the hoop, then smirks. He removes his head (in a cartoony sort of way), and aims; he's trying to score. He throws, aaaand... misses. His head bounces off the rim, and hits the floor. His face shows indifference, but his body overreacts and falls to it's knees, pounding it's fist on the floor. I'm definitely going to go with pencil and paper drawing for this task. While I'm more experienced in digital animation, I've really grown to enjoy the "traditional" methods. It'd be an interesting challenge, not to mention somewhat enjoyable. In the session, I lined out my rough keyframes. I'm going to work on the task on days off and in spare time between lectures, but I'll try to work on it as much as possible.
This session, we focused on the principles of anticipation and follow through. The 12 Principles of Animation, as laid out in The Illusion of Life by Disney animators Frank Thomas and Ollie Johnston, are designed to make the animation onscreen broadcast what's happening as easily as possible. They should be treated as a checklist of sorts when animating anything. The animator should always consider where they can be used, to enhance movements and / or communication. Anticipation is the way an animator will show the energy buildup before a larger movement. It usually involves a smaller, counteraction which gathers up energy before expelling it. It's also used as a visual cue for the audience, letting them know an action is about to take place. Anticipation being applied to an action also delivers a more believable outcome.
(Anticipation - Alan Becker on YouTube)
To give an example of a character using anticipation, here's the Genie from Aladdin. When talking to Aladdin, Genie begins raising his hand. This is to signal to the audience there's a motion happening involving his hand / arm, and they should pay attention to it. It also helps to build up energy, for when he makes the motion of bringing the arm back down in a much grander, bigger motion.
POSE 1 - Hand and forearm up
POSE 2 - Hand and forearm brought down
(Aladdin - dir. Ron Clements and John Musker)
Follow Through goes hand in hand with anticipation, essentially acting as the "other end" to anticipation. Energy is required not just to start a movement, but to stop it too. When a character makes a large action, there's usually parts that will keep moving, even after the main action finishes. It could be a cape flapping, a hat shifting, etc. While it's usually applied to accessories, it also applies to body parts in specific scenarios. For example, if someone punches, then usually there body will still move back a little bit after the punch is complete.
(Follow Through - Alan Becker on YouTube)
An example of this can be seen in WALL-E, as WALL-E leaves his home. He drives along to the doorway, then stops. However, though his body has stopped, his hands and treads move slightly in reaction to the sudden stop.
POSE 1 - Body stops moving
POSE 2 - Hands and treads move in reaction
POSE 3 - Hands and treads settle
(WALL-E - dir. Andrew Stanton)
After being taught this, our task for the day was to make a jumping animation that would include both anticipation and follow through. We should make guides, keep it rough & sketchy, and consider the arc of the jump.
Starting off, I knew that I'd need to make multiple layers for my guide. The neutral start / end positions and the anticipation / follow throughs would be standing on the exact same piece of ground, with overlap in the positions if done on one sheet. So I made 3 different guide layers; one for extremes, one for anticipation / follow through, and one for inbetweens. This was a big help, although did prove a little tricky when trying to inbetween, because I was trying to look through my current sheet at two sheets underneath, instead of the usual one.
I linetested my first attempt, resulting in this.
While it gives off a convincing enough effect, I realised that the anticipation at the beginning didn't signpost the movement coming up well enough. I needed BIGGER movements.
So, I went back to the drawing board (literally), and made more inbetweens at the beginning to give a bigger movement. The arms go up further to a bigger extreme, and thus, give off a better signal.
The second jump feels a lot more natural, with the more obvious anticipation and smoother jump in general.
I think if I was to do this jump again, I would try and give it a little bit more personality to the jump with more unique actions for the anticipation and recoil, instead of generic poses.
Overall, I'm fairly happy with this task. I did hit a bump along the way, but instead of letting it get to me and make the work seem lesser, I took it and improved upon it. The talk on failure last week made me feel a lot differently towards work going wrong, especially comparing this task to when my pendulum swing originally went wrong.
We looked at iteration in this session. Iteration is the act of repeating a process in order to generate a sequence of outcomes. The aim of iteration is to approach one desired goal, target or result. Each repetition of a set of steps is one iteration, where the result of one iteration directly leads into the start of another. For example using computing terms, iteration is when you have an looped segment of code; if x != 5, x = x + 1 over and over, until x = 5. Iteration applies to character designs, scripts, and characters themselves. Characters don't get just one design and that's final, there are steps and processes the team goes through until they reach the final look.
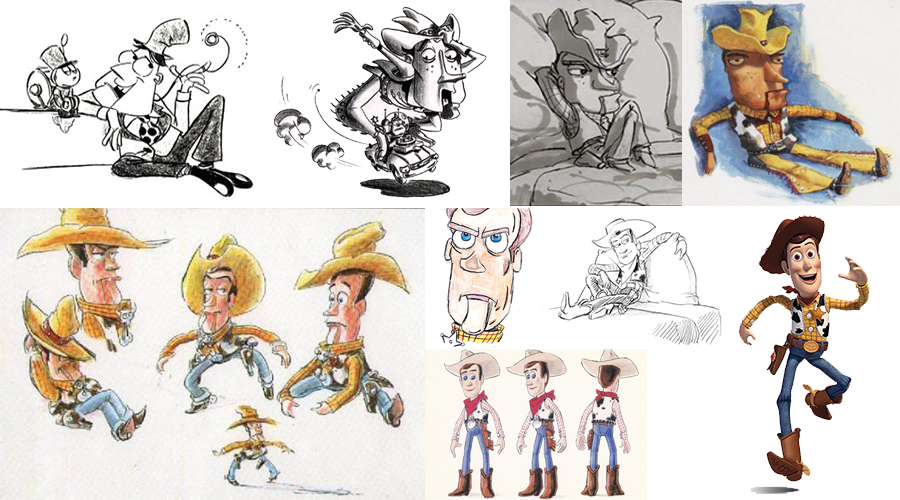
For example, in Toy Story, Woody and Buzz Lightyear looked drastically different to how they turned out in the completed film. Originally, Woody started out as a ventriloquist dummy cowboy, before eventually being toned down into a cowboy ragdoll. Buzz Lightyear also went through some changes, going from a small, 50s-esque spaceman to a taller space marine.
Character motivations and attributes also change through iteration too, depending on if the audience is responding well to the characters or not. Using the Toy Story example again, Woody was originally designed to be a selfish, cruel leader of Andy's toys who resented anything new that came along. Buzz, originally named Tempus from Morph, was even more naive than in the final film, and was too trusting of Woody, whereas final Buzz distrusts Woody if anything.
(Toy Story character test - credit Pixar Animation Studio)
(Toy Story Black Friday Reel - credit Pixar Animation Studios)
Iteration can also apply to the animation tests we've been carrying out in our dynamics sessions! FAILURE. The basic definition of failure is a lack of success. It's the fact of someone or something not succeeding. But it's not something to fear, and we shouldn't have the fear of making our first and worst attempts! We watched a TEDxBYU talk, hosted by Eduardo Zanatta, who talks about failure.
(Failure Is Part Of Success - credit TED on YouTube, Eduardo Zanatta)
We shouldn't let the fear of failure blind us and make us overly cautious when trying the new; it's good to take risks and experiment! We learn most when things go wrong. And even with that in mind, we should TRY and fail sometimes; we can look at them and reflect, see where we can improve and where we've come from! With all that said, the goal of the session was just to improve upon an earlier animation we'd done prior. We could choose a ball bounce, pendulum swing, secondary action, etc. I decided to go with my walk cycle, and try and improve upon it by actually ADDING the second step. Making the frameswas simple enough, just taking the original frames that from the first step, and using them as reference when drawing the same motion with the limbs swapped sides. In total, I did ~8 new frames for the second step; all odd numbered main frames.
In general, I feel like this session went well! The talk about failure and how you shouldn't fear it really spoke to me; I think of myself as overly cautious, and as someone who doesn't take risks. But now that I have the reassurance that failure is ok, and nothing bad will come from it, it really does put my mind more at rest when something does go wrong.
Today's session focused on the traditional walk cycle. In animation, a walk cycle is created to give animators a sense of the character in movement, as they walk on the spot.
(credit: Richard Williams, "The Animator's Survival Kit")
Our tutor for the day showed us a premade set of frames in Photoshop, and demonstrated what each type of frame was for.
First, there's the contact frame (see frames 1, 9 and 17 of above image). These are the positions when the feet will be furthest apart from each other. It's also when a foot which previously was airborne first hits the ground.
In between contacts is passing positions(see frames 5 and 13). These are the motions inbetween two extremes, or in this case, contact frames. In walk cycles, it usually involves one straightened out leg in full contact with the ground, and one raised, lightly bent leg.
Alternating in between contacts and passing positions are the highs and lows (see frames 3 & 11 for lows, and frames 7 & 15 for highs). These are when the whole body moves down or up in accordance to what the legs are doing. When legs are both bent down, the body moves downward accordingly, as does moving up when the legs are more straightened out.
And then filling in the gaps are the inbetweens(every even numbered frame). These are, simply enough, meant to fill in the gaps between the two frames it's sandwiched between to make the movement smoother and more convincing.
When we were first presented with this task, I won't deny, I found it a bit daunting. While I've tried walk cycles before, they weren't necessarily great. They staggered and gave a very rough feel, and I worried my previous inexperience would hinder this attempt. Even when drawing out each frame, with a reliable reference on the screen at the front, I felt like when I line tested, it would turn out bad and I'd have to try again.
As mentioned, I followed along with the guide at the front. While I needed the reference for the contacts, passings and highs & lows, I felt confident enough with the inbetweens to do them myself. I would occasionally flick through my drawings, trying to get some semblance of just what it would look like in motion, I couldn't get a good idea of it.
Eventually, I managed to line test and I was extremely happy with the results! Where I had worried that the animation would look bad while drawing the frames, putting them all together brought out a smooth, convincing walk cycle!
Upon presenting it to the tutor to get some feedback, I was told it was a good cycle. The only feedback I got was the head seemed to get a little bit of a double bounce on the high, but that was due to my more rough linework and the tutor, as they put it, "being nitpicky". Once the main walk cycle was complete, we moved onto getting the arms to move. We were only really given the first contact position to work with, alongside being advised that it's the same basic principle as the legs when it comes to how to position the other frames. I was much more confident with this step, since I have a better idea of how arms work than legs. I decided to offset the arms by one frame; for example, where the extreme for the legs would be frame 1, the arms' extreme would be frame 2. I figured this would make a less robotic movement, since it doesn't look like a deliberate effort to move both arms and legs at the same time. I'm happy with how the arm animation turned out, having the figure seem like they're doing a "happy march", for lack of a better term.
I think that so far, this has been my favourite of the animation tutorials we've been through! This is where we crossed the threshold into the more character driven animation, which is the stuff I find exciting and fun to make! There are things I would've done differently for this session, however. I think gaining a better understanding of how legs work and go together is essential... perhaps life drawing or studying up on it will help most. Or it could be as simple as observation!
The next step to take the walk cycle is, quite literally, step 2. I need to follow through on making a fully looping walk cycle, instead of looping the same single step. While repeating the one step gives the illusion of a full cycle, the legs changing colours (used while animating to remind myself which leg is which) takes away from that.
This week was mostly based around learning more techniques to do with Dynamics. On both Monday and Thursday, we did actual animation exercises; both involving bouncing balls.
Regular Bouncing Ball
Bouncing Ball with Squash and Stretch applied
"I didn't run into any real issues with this task, and I feel I completed it in about average time. I didn't feel like I was going too quickly and rushing, which was a worry I'd had last week. At the same time, I wasn't going really slowly to the point of annoying myself." (link for original post)
Secondary Action - Bouncing Man
"I decided to add a little figure sitting on top of the ball, who would bounce up and down as the ball did. I was really enthusiastic for this task, especially since it allowed for more creativity and personality than the other tasks.
I ran into one problem where I wasn't sure what the appropriate distance between two frames would be, which lead to two different versions of frame 12, dubbed "12 v1" and "12 v2". After using both and comparing outcomes, I found that 12 v1 worked better." (click for original post)
Secondary Action - Portal Gun
"I wanted to have it somewhat inspired by the Portal game series, by having the ball bounce along, open up a portal, fall through it, and continue bouncing after falling out the second portal. I didn't run into any issues with this animation; I thought that was surprising, given the more complex arcs and the amount of things in the air I had to manage." (click for original post)
I'm really happy with how these came out, especially the Portal Gun one. It took some trial and error for certain little bits within animations, especially when it came to spacing of stretched out bouncy balls on ascension and descent. However, these issues were easily solved with making multiple versions of the same frame, and seeing which one worked best. If I was to tackle this task again, I maybe would've considered varying ball weights for each animation. For all 4 animations, they all seem to be the same weight and bounciness; that being, very light and very bouncy. To try and bring in some more variety, I would try a heavier ball with an appropriate secondary action to go with it; for example, a bowling ball sort of weight, maybe crushing a bowling pin upon contact with the ground. This week, I'm also more confident regarding the character essay. The session about building characters from the inside out proved beneficial, especially in the sense that I've since looked back at old characters I made and realising how flawed they are as characters. I'm now fairly assured that I'm going to go with Emmet from The LEGO Movie, with my question still needing the final validation before I delve further. Right now, primary research is on the character, the film and the brand the two are based upon. Overall, this was a great week! Many useful techniques that will prove valuable in the future, both of this course and in my animation career in general. This week’s introduction
to the bouncing ball and secondary actions were really interesting. It’s
steadily creeping into the territory of animation I’ve been looking forward to
doing, with more fun visuals and creativity involved; “the good stuff” if you
will. I’d say in terms of improvements, I’d say the portal gun secondary action
animation could use a little timing work, and some more obvious cues for the
portal gun actually appearing. But apart from that, happy all around!
This session focused on secondary actions for objects and people. First off, we watched "The Twelve Principles of Animation Rap", created by Haydn Spencer.
(credit: Haydn Spencer on Vimeo)
In all honesty, this was a really funny watch, and a pretty great way to get the principles stuck in your head with a great tune! And it briefly talked about the principle we were focusing on; Secondary Actions. Secondary actions are added to a main action to help give a scene more life, as well as help support the main action. For example, with someone walking, their legs moving would be the primary action, but swinging arms and a bobbing head would both be considered separate secondary actions. It's important to note that secondary actions shouldn't overtake the primary actions, but should instead act as an emphasis to the primary action. We watched another Alan Becker Principle video, this one covering secondary actions.
(credit: Alan Becker on YouTube)
Becker gave many more examples of secondary actions, and how they can be used to express different emotions of a character. For example, when someone's knocking a door, their other arm can be used as a means of showing how the character feels through a secondary action. If their fist is clenched, they could be angry and really pounding on the door. A hand with fingers splayed could show a more dainty knock.
For our task, we had to apply a secondary action to a bouncing ball; this could be a swinging tail, ears that flap, etc. I decided to add a little figure sitting on top of the ball, who would bounce up and down as the ball did. I was really enthusiastic for this task, especially since it allowed for more creativity and personality than the other tasks. I ran into one problem where I wasn't sure what the appropriate distance between two frames would be, which lead to two different versions of frame 12, dubbed "12 v1" and "12 v2". After using both and comparing outcomes, I found that 12 v1 worked better.
After that, I still had some time left, so I decided to challenge myself with my second animation. I wanted to have it somewhat inspired by the Portal game series, by having the ball bounce along, open up a portal, fall through it, and continue bouncing after falling out the second portal. I didn't run into any issues with this animation; I thought that was surprising, given the more complex arcs and the amount of things in the air I had to manage.
In conclusion, I feel like I'm happy with secondary actions. My outcomes came out quite well, and I'm eager to apply them to more complex things in the future!
For this session, we started going over the dynamics of a bouncing ball. Starting off, we watched a TED-Ed video about timing and spacing in animation. It's primary discussion about bouncing balls proved relevant and helpful.
(credit: TED on YouTube)
After the TED video, we talked about how the ball bounce incorporates many important aspects of animation into it's movement, including:
Path of action
Arcs
Momentum
Timing
Keyframes / Inbetweening
Weight
Speed
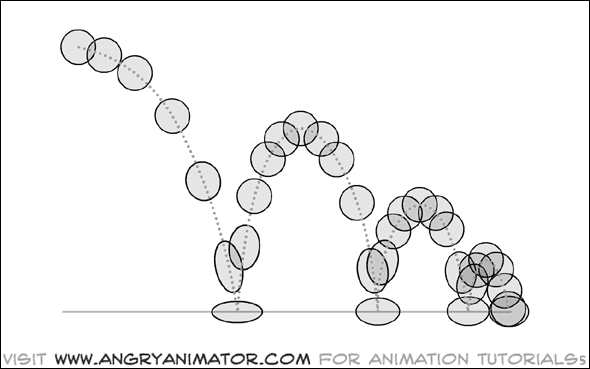
Path of action was further elaborated on, when moving onto our task for the day. The Path of Action is the direction that a character or object takes when it moves, and contains arcs and specific timings. For our ball bounce exercise, we should consider the weight of the balls and their speed. As the ball descends, it should gain speed, and lose it as it ascends back up. More frames should be bunched together near the top of an arc, showing the speed and ease of the ball.
(credit: www.angryanimator.com)
We also went over squash and stretch, a technique commonly used in more cartoony animation which gives things a more bouncy feel, and an elasticity to whatever uses the technique. For a ball with squash and stretch applied to it, it elongates as it falls, and squashes flat as it comes into contact with the ground. An important rule to remember with this technique is that the object must ALWAYS have the same volume. If the ball increases by the Y axis, it must decrease by the X axis, with the inverse also ringing true. When the object reaches it's slowest point, it returns to it's regular state.
After that, we got started on our animations. I made two; one of a regular bouncing ball, and one with squash and stretch applied. We used F12 paper and peg bars; the "traditional" animation method.
I didn't run into any real issues with this task, and I feel I completed it in about average time. I didn't feel like I was going too quickly and rushing, which was a worry I'd had last week. At the same time, I wasn't going really slowly to the point of annoying myself.
After the exercise was complete, we were introduced to Alan Becker's 12 Principles of Animation series, based upon the 12 rules established by Disney animators Frank Thomas and Ollie Johnston. I'd watched Becker's series before, as well as his "Animation vs Animator" series. The principle we watched first was about squash and stretch.
(credit: Alan Becker on YouTube)
Becker reinforced many of the rules we were told about at the beginning of the session, especially relating to volume and states of an object. Overall, I feel like this session was great! It was definitely an essential part of animation, as I had guessed before the course. I don't think there's anything I would've changed really, maybe just given a half hour longer to capture my second animation in the same session, instead of going back and recording it later.
This week was the introduction for our projects for the next two months, focusing on the fundamentals of animation. Within the fundamentals project, we focus on four areas:
1 - Dynamic Animation
2 - Character Design
3 - A character research essay
4 - Life Drawing
This week, we focused on Dynamic Animation and the essay. MONDAY On Monday, we were introduced to what we would be doing over the next 8 weeks, including exercises in multiple mediums (stop motion, 2D hand-drawn, 2D digital), different types of exercises (walk-cycles, ball bounces and pendulum swings), as well as programs we would be using. We were explained the concept of framerates, and certain characteristics involving it which makes the illusion of animation more convincing. We then moved onto talk about Dynamic Animation in itself. It involves creating a believable movement, that feels right for whatever's moving. Inertia (the weight / effort involved with an object), different forces and resistances are all defined and discussed in terms of how they affect an animated object. These forces also affect speed and acceleration. Movement from point A to point B isn't strictly linear, so frames controlling speed had to be considered. Anticipation and held positions help simulate a more believable movement. That afternoon, we were grouped up and sent to work in DragonFrame (a line testing program) to try and create an accurate pendulum swing animation using a penny and a piece of string, keeping in mind pendulum weight, length and direction. We used an HD Webcam 920 to capture our images, as well as the DragonFrame program mentioned prior. A peripheral was also used to capture the images; a keyboard-like extension with dedicated keys to capture images, cycle through previous frames, etc. We took reference for the animation from a series of photographs we had taken, where we swung a ball on a string very lightly, to see how the pendulum would have to be translated. After we got out references, we moved to the computer and tried to start animating.
Unfortunately, my group hit a bump in the road, in that DragonFrame wouldn't work properly. Upon boot-up, you need to change the capturing source and video assist source from the integrated webcam to the inputted one. However, when we changed this, nothing happened onscreen. After numerous log-ins and outs for around 20 minutes, we simply restarted the computer entirely, and then it started to work. Troubleshooting the issue took up valuable animation time, and it's never easy to predict when you're going to encounter a problem like this. Next time, safeguards should be drawn up in case something like this happens again. Once we had fixed the problem, we managed to create two animations; the first, we agreed, felt a bit too unnatural. It seemed like the weight of the pendulum fluctuated, which didn't deliver a convincing movement. We retried, this time considering using fewer frames so that even if we had a skeleton of a swing, we could see what worked and what didn't. Our second attempt turned out much better, giving a more believable swing.
If we were to do this again, I'd say creating a much more concise plan of action would be beneficial. Outlining backups, some kind of written list of frames needed, all should be used come next line test. TUESDAY Tuesday was our introduction to the character research essay. In the unit, we would be looking at why characters & research matter, the history of animated characters, how to develop characters, archetypes vs stereotypes, and learning essential research and essay skills. The essay is to be 1000 words (with a margin of 100 words each way). We choose an animated character and question (the latter being guided by a tutor), and keep working on it while getting individual assistance for rough drafts. We were also advised to start a list of characters we may use, which I'll include at the end of the Tuesday summary. We do have to consider which characters would be helpful or not; this can be in terms of what area of animation we want to go into, what types of characters we want to make, etc. We also went over contextualisation. Looking at a character from a broader viewpoint, and thinking of them in terms of what larger archetype / genre they fall into, the social and / or cultural issues, and their message of both the fictional world they reside, and the real world. We talked about what a character IS. There were a few definitions, but the two main ones were:
"Usually a being represented in a film, play or story"
and
"A particular combination of qualities distinctive to a person or place."
Characters are important because they're the thing that audiences remember most about a film. People may not remember the plot of The Empire Strikes Back, but they'll remember Luke Skywalker and Darth Vader. Characters don't necessarily have to be human, but they have to be human enough to have audiences relate to. This can be achieved through simple character motivations and goals, or through anthropomorphism (the act of giving a non-human human qualities). Human qualities in characters are there for the human audience, who want to connect with this characters beyond just seeing them. Characters are also used as a delivery method of a message or moral. For example, Wreck-It Ralph's titular character delivers the message that it's ok to be yourself, even when others around you judge you on a surface level.
"I'm bad... and that's good. I'll never be good... and that's not bad. There's no-one I'd rather be than me" - Ralph, "Wreck-It Ralph" (2012)
We then went on to watch a series of key turning points in animation, including:
Gertie the Dinosaur (1914) - Considered the first character based animation, where a live action man would "talk" to the dinosaur, and it would react accordingly. Gertie's actions gave off a personality no unlike a dog's, with an occasional response to command, but usually just doing what they want.
Felix the Cat(1919) - The first animated "star", Felix's adventures often involved him getting into situations do to his cheeky, anarchic personality. The cartoons were also some of the first to utilise the rubberhose style, which involved characters ignoring basic anatomy rules and stretching and removing body parts.
Out of the Inkwell(1921) - Created by the Fleischer Brothers (who would later go on to make Betty Boop and Popeye), the series would show off rotoscope animation, where an animator would draw on top of a piece of live action reference.
Oswald the Lucky Rabbit(1927) - Walt Disney's first cartoon star, before being lost to Universal head Charles Mintz soon after the characters inception.
Mickey Mouse(1928) - The first Mickey Mouse cartoon Walt Disney released, "Steamboat Willie", was the first cartoon to be synced with recorded sound, including the iconic whistle now played at the beginning of every Walt Disney Animation Studios film.
Snow White and the Seven Dwarfs(1937) - The first feature length animated picture, made in a drought of short form cartoons. It was a big gamble for Disney, with the term "Disney's Folly" being coined. Would they hold audience interest for 90 minutes? Could they make audiences care for an animated character? No-one knew, because it hadn't been done before. Fortunately, due to a new focus on "warmth and believability", Snow White went on to make $8,000,000 to a $2,000,000 budget.
Through Snow White, we also had a look at one specific scene designed to deliver an emotional punch to the audience; where the Huntsman nearly kills Snow White. We found that building up the shadow, followed by the knife, and contrasting it next to Snow White's innocence, delivered a more powerful pathos (appeal to the emotions).
That was all we had Tuesday, so I started coming up with characters I could look at for the essay.
Buzz Lightyear (Toy Story, 1995)
Emmet (The LEGO Movie, 2014)
Bill Cipher (Gravity Falls, 2012 - 2016)
Mr Meeseeks (Rick and Morty, 2013 - Present)
Genie (Aladdin, 1992)
Oswald the Lucky Rabbit (Oswald the Lucky Rabbit cartoons, 1927)
Batman (The LEGO Batman Movie, 2017)
THURSDAY
Thursday was out introduction to traditional 2D animation methods. I was really excited for this; I'd wanted to try it for ages, but never had the proper resources for it. Before delving into it though, we had a talk on research for our projects. It's a vital aspect of studies, and vital in gaining a better understanding too. We were also advised to look BEYOND animation for inspiration. Live action films, fine art, fashion, games, comic books... all valid sources of inspiration. We were also advised to look into colour theory, historical context, cultural representation and ethics through research too.
Onto the animation task of the day, we looked at the three different types of frames in 2D animation; the Extremes, the Passing Positions, and Inbetweens.
Extremes, also known as Keyframes, are what represent the start and end of an action, with some kind of change in position, shape, direction, etc.
Passing Positions, or the Breakdown, is the frame in the middle of the two extremes, midway through the action.
Inbetweens are between two images, filling the gap between them and creating the illusion of movement.
Spacing Charts were also demonstrated to us. Spacing charts are visual representations of the spacing of frames, with the extremes being at each end, and frames represented by smaller lines being inbetween.
(Moana line test, produced before the CG animation, uses multiple spacing charts for each of Moana's smaller movements. Animated by Randy Haycock.)
By bunching up certain frames at the beginning and end of a motion, it creates a nicer easing in and out movement. An object will slow down, then speed up exponentially, then gradually slow back down once it's halfway through it's arc.
After all the build up talk, it was time to get working on our animation! We did a pendulum swing once again, this time using pencils and F12 Paper; the special kind of holed paper animators used. The paper fits a specially designed peg bar, and allows multiple pieces of paper to be stacked on top of each other while still remaining lined up. The paper also has a slight translucent quality to it, so you can see drawings previously made up. My first pendulum swing was made up of 13 frames, and while it was a good first start, i was advised to try again. The first pass was a bit too fast, and needed more frames for the ease in and out. The arc was also too straight, and needed a bit more curve to it.
Going back to the drawing board (literally), I gave it another shot with more frames and an altered arc. This version used nearly 20 frames, and had a much nicer ease in / out, and a more believable arc.
Satisfied with my pendulum swing, I moved onto the second task. For this, we had to interrupt the pendulum somehow, so that it wouldn't complete one full swing. We had no instructions on how to do so, and were told to be creative with it. I decided that making the pendulum act like a wrecking ball could be a fun way to go about it. I started the arc with a very slight swing to the right, to build up some momentum. The ball then swung quite hard to the left, until it finally swung right quite fast, hitting a wall before it had the chance to ease out. The ball interacted with the wall, having chunks of it blow out and a dust cloud pass over the ball. I was extremely satisfied with the first pass of the animation, as it had achieved exactly the effect I wanted.
Doing this task again, keeping believability in mind is an essential step to take from the get-go. My enthusiasm of the task slightly clouded that judgement in the first pass, leading to a pendulum swing that left a lot to be desired. But if I keep working like how I did for the second pass of the pendulum swing, then I should be fine going forward. CONCLUSION Overall, I feel like this week was mostly focused on taking first steps. Not just in animation, but into the course and university life in general. We now know all our starting points, and how to best utilise and learn from them. If I was to take one thing I learnt this week to continue doing, it would definitely be the traditional animation methods. Drawing every frame on paper is unusually satisfying to do, compared to my usual methods in 2D digital animation.